图像生成:扩散模型
参考资料:
CVPR 2023 Tutorial: Denoising Diffusion Models: A Generative Learning Big Bang
CVPR 2024 Tutorial: Diffusion-based Video Generative Models
【较真系列】讲人话- Diffusion Model 全解(原理+代码+公式)
Denoising Diffusion Models 在图像中的应用
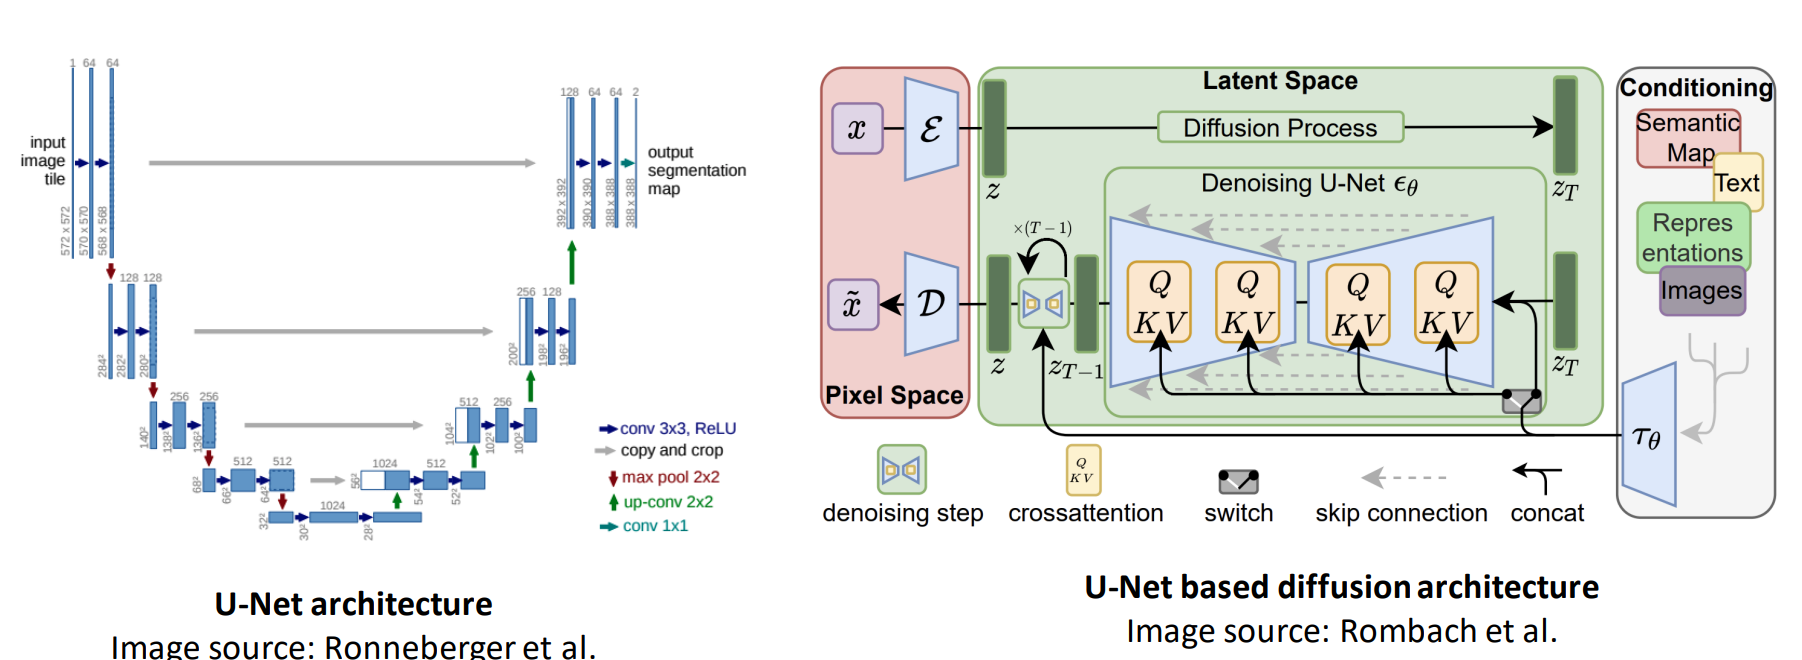
Diffusion Model 的结构
-
基于 U-Net 结构:被广泛用于 text-to-image Diffusion Model 中
- Imagen
- Stable Diffusion
- eDiff-I
-
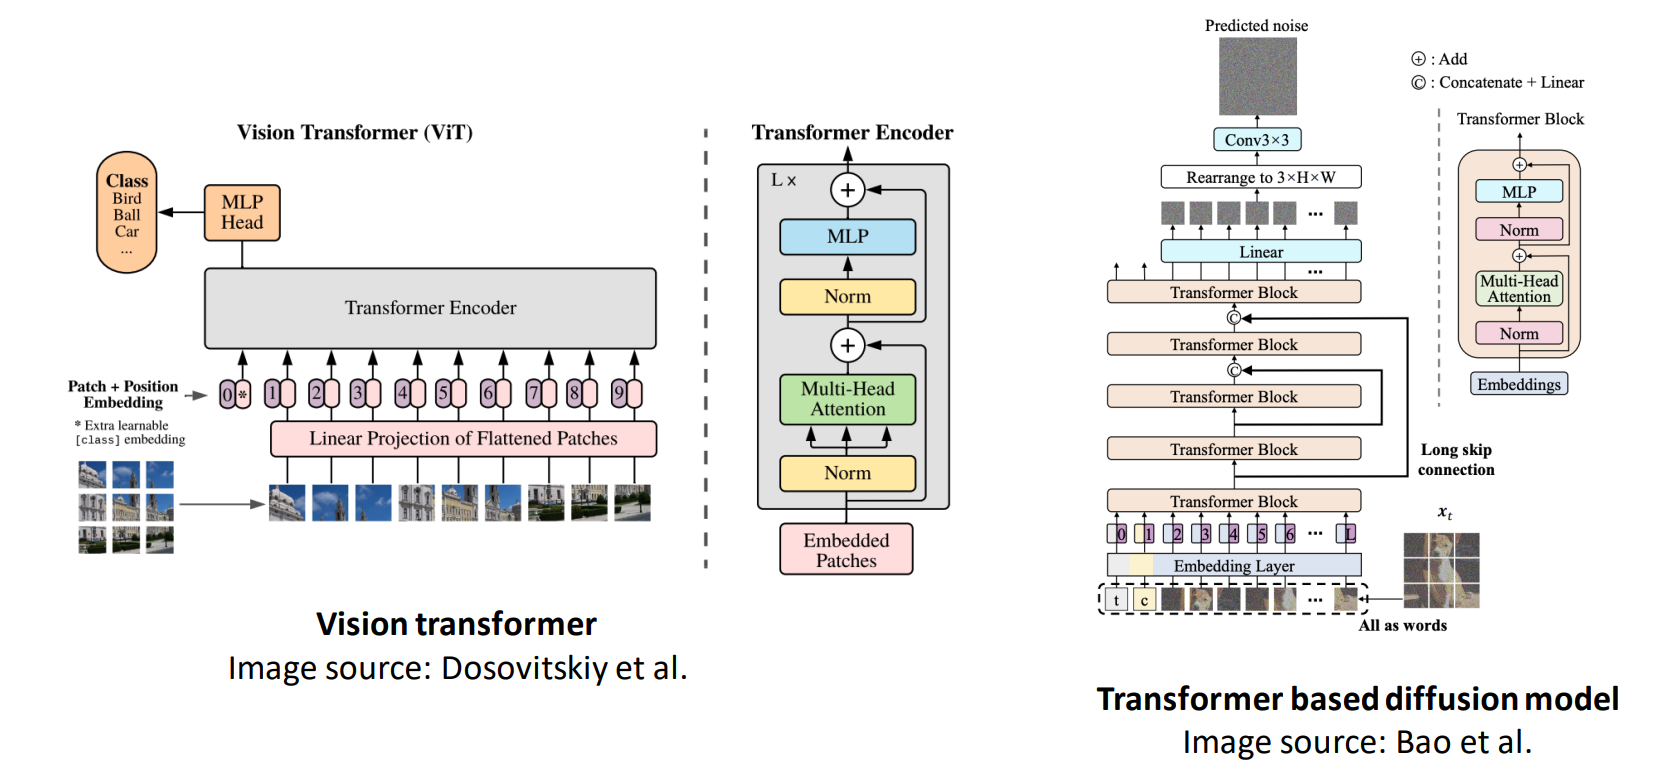
基于 Transformer 结构:将图像分割为 patch 后作为 tokens 输入至 Transformer 中
- Scalable Diffusion Models with Transformers
- One Transformer Fits All Distributions in Multi-Modal Diffusion at Scale
- Simple Diffusion: End-to-end Diffusion for High Resolution Images
使用 Diffusion Model 对图像进行编辑和定制
目前有三种常见的引导(Guidance)方法:
- RGB Pixel Guidance
- Text Guidance
- Reference Image Guidance
RGB Pixel Guidance
ICLR 2022, SDEdit: Guided Image Synthesis and Editing with Stochastic Differential Equations
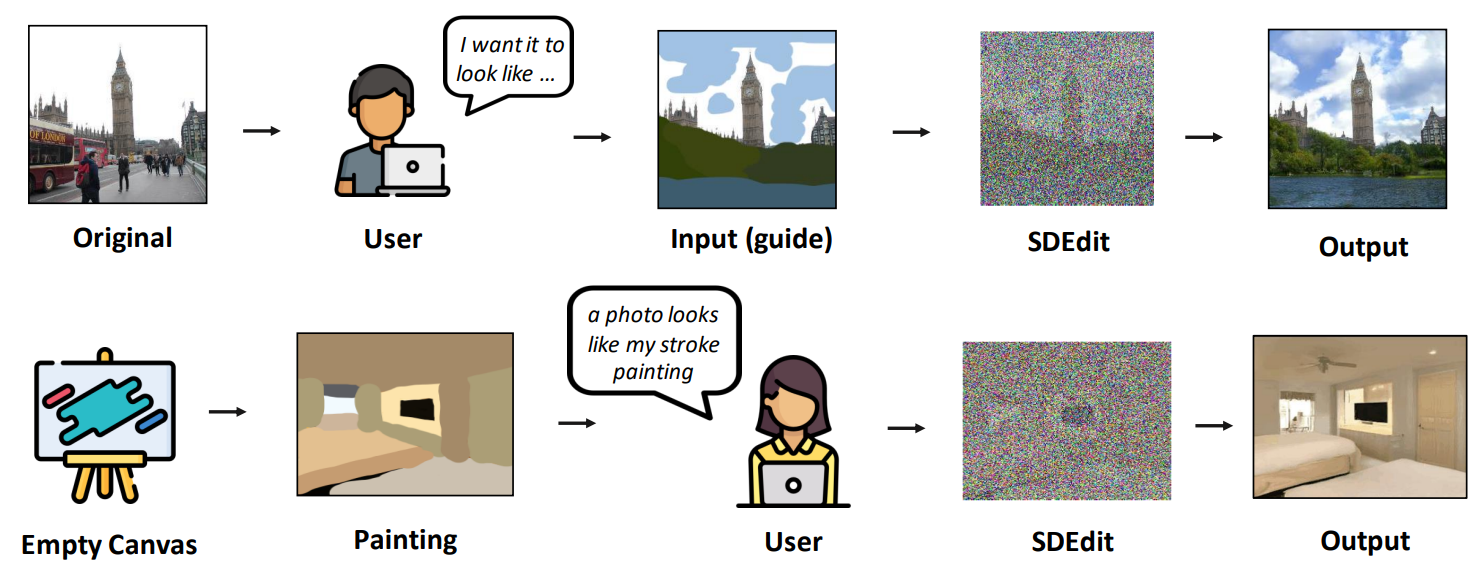
Given an input image with user guide in a form of manipulating RGB pixels, SDEdit first adds noise to the input, then subsequently denoises the resulting image through the SDE prior to increase its realism.
通过用户在原图上给出一些引导,比如 RGB 像素的涂鸦(stroke painting),甚至可以不给定原图,直接纯手工绘制一个涂鸦画作为输入,模型首先对输入添加噪声,最后通过随机微分方程的先验增加图片的真实性,最终根据输入的带有引导信息的图像生成对应的结果。
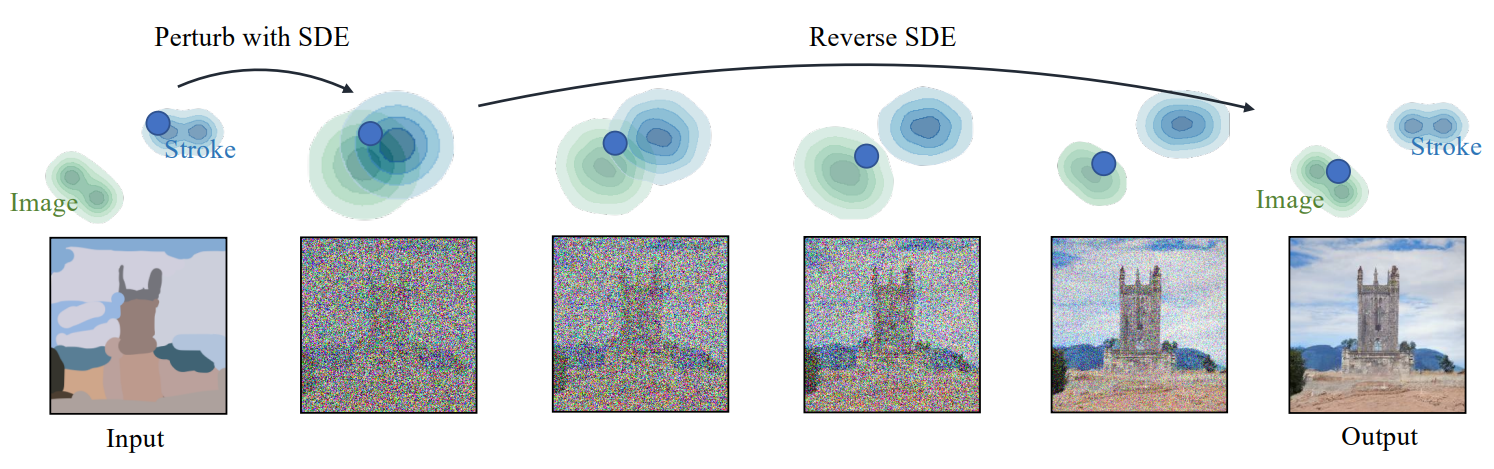
Synthesizing images from strokes with SDEdit. The blue dots illustrate the editing process of our method. The green and blue contour plots represent the distributions of images and stroke paintings, respectively. Given a stroke painting, we first perturb it with Gaussian noise and progressively remove the noise by simulating the reverse SDE. This process gradually projects an unrealistic stroke painting to the manifold of natural images.
下图中的蓝点代表本文的编辑过程,绿色分布代表真实图像的分布,�蓝色分布代表 stroke paintings 的分布。
当模型首先被输入 stroke painting 后,使用高斯噪声进行扰动,然后通过模拟反向随机微分方程逐步移除噪声。这一过程逐步将不真实的 stroke painting 投影到自然、真实图像的分布中。
Text Guidance
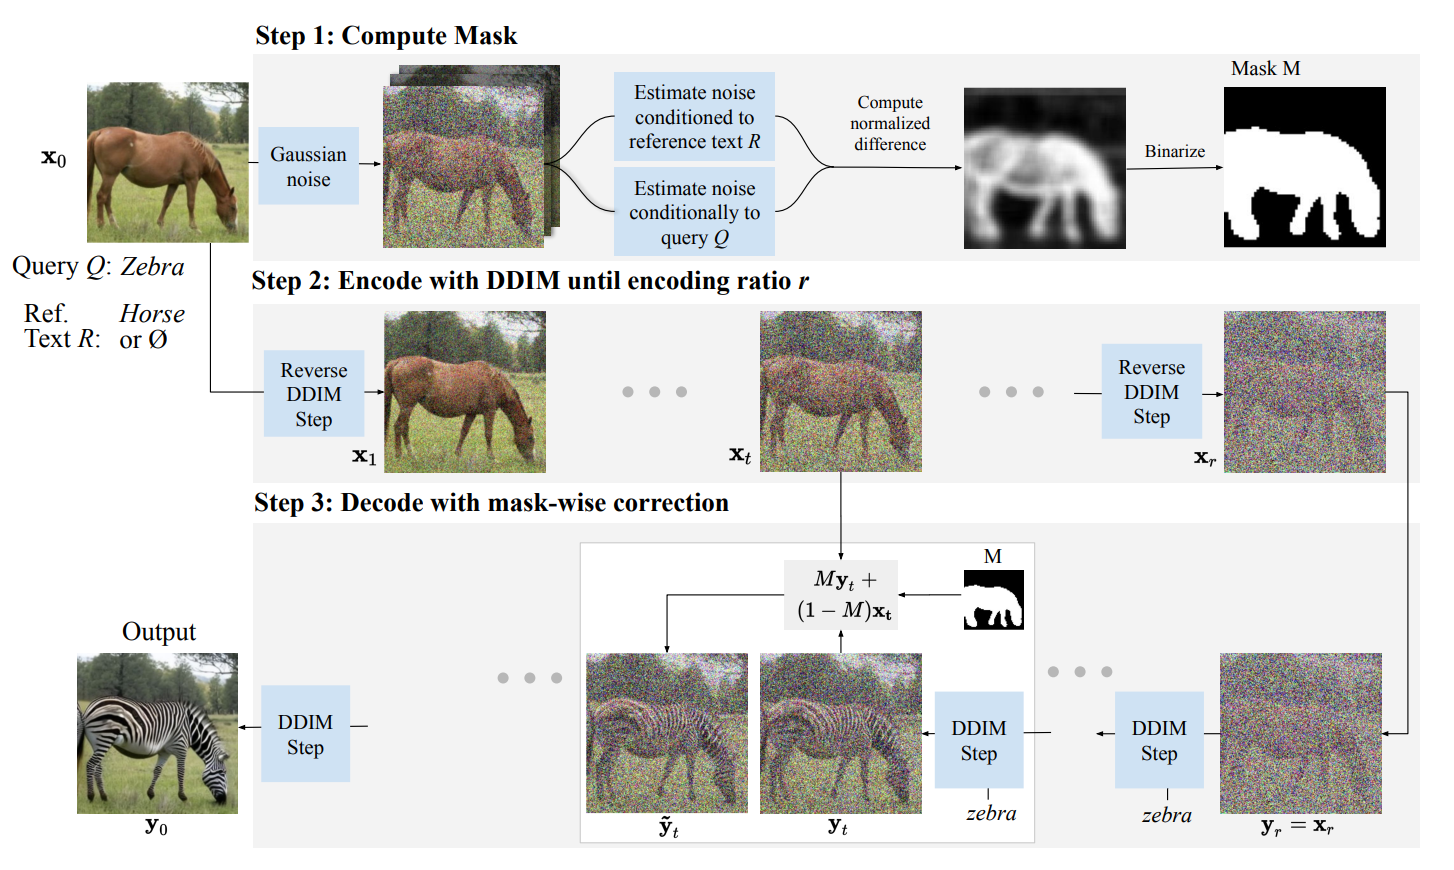
ICLR 2023, DiffEdit: Diffusion-based semantic image editing with mask guidance
论文引入一个掩码生成模块,该模块确定图像的哪一部分应该被编辑,然后只对掩码部分执行基于文本的扩散。
首先用户输入参考图像以及两个查询文本和参考文本,查询文本 Query 是参考图像的标题或用于描述图像,参考文本 R 用于描述想要替换的效果。
掩码生成模块首先为输入图像添加噪声,并进行两次去噪,一次通过参考文本 R 进行,一次通过查询文本 Q 进行,并根据去噪结果的差异推导出参考图像中的掩码区域。
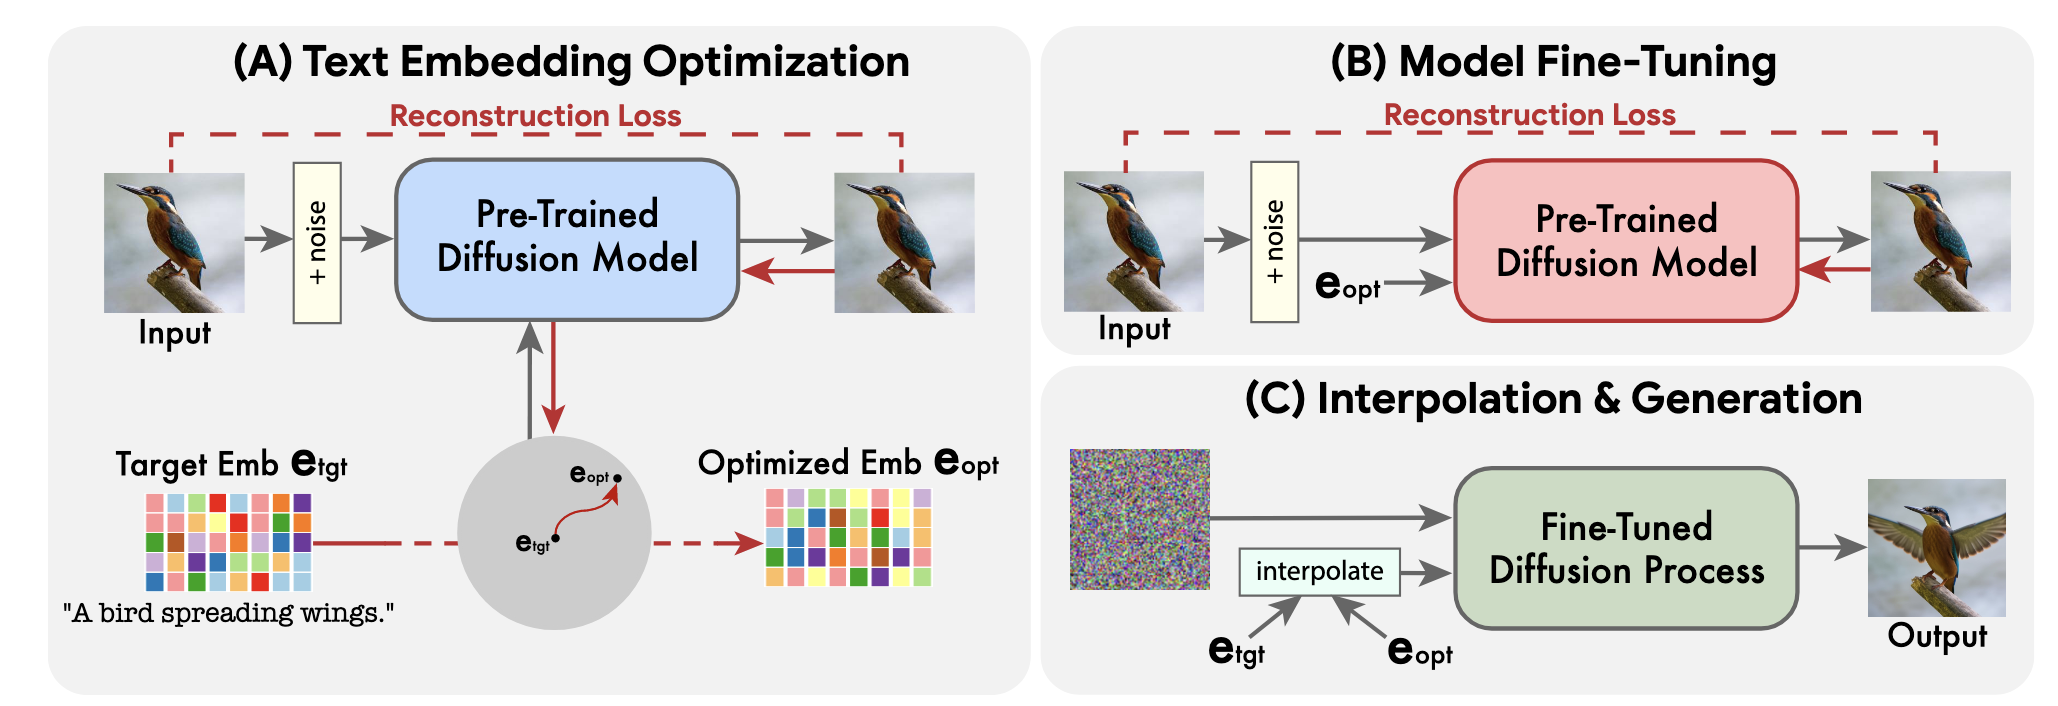
CVPR 2023, Imagic: Text-Based Real Image Editing with Diffusion Models
模型接受真实图像(参考图像)和目标图像文本描述 作为输入。
-
模型首先对目标文本进行编码,得到初始嵌入表示 ,然后优化 对原始图像进行重构,得到优化后的目标文本嵌入表示 。
目标文本首先通过一个文本编码器,该编码器输出其对应的文本嵌入 ,其中 是给定目标文本中的 token 数量,而 是 token 的嵌入维度。固定生成扩散模型 的参数,并使用重构损失来优化目标文本嵌入 :
其中 , 是输入图像 的噪声版本, 是预训练的扩散模型权重。这使输入的图像尽可能接近的文本嵌入表示,即只更新 Text Embedding 的参数,从而得到 。
这种邻近性使得在嵌入空间中进行有意义的线性插值成为可能,而对于远距离的嵌入表示来说并不表现出线性行为。
此时使用的是低分辨率版本的 Diffusion Model,分辨率 ,训练设定为 100 次迭代。
-
由于第一步进行的 Text Embedding Optimization 步数较少,优化后的 并不能直接与输入图像对齐。
因此第二步固定优化后的目标文本嵌入表示 ,仍使用第一步中的 Reconstrcution Loss 对第一步使用的 分辨率的预训练 Diffusion Model 进行微调,设定为 1500 次迭代。
同时,为了捕获原始图像中的细节,保持高保真度,文章还会使用初始的 Text Embedding 层,即 以及原始图像通过 Reconstruction Loss 再 fine-tune 一个从 到 的超分辨率 Diffusion Model,设定为 1500 次迭代。
-
使用初始目标文本嵌入表示 插值优化后的目标文本表示 ,插值方式如下:
插值得到的文本嵌入表示分别通过 的基础 Diffusion Model、从 到 的超分辨率 Diffusion Model,以及最终的从 到 的超分辨率 Diffusion Model 得到最终的目标图像。
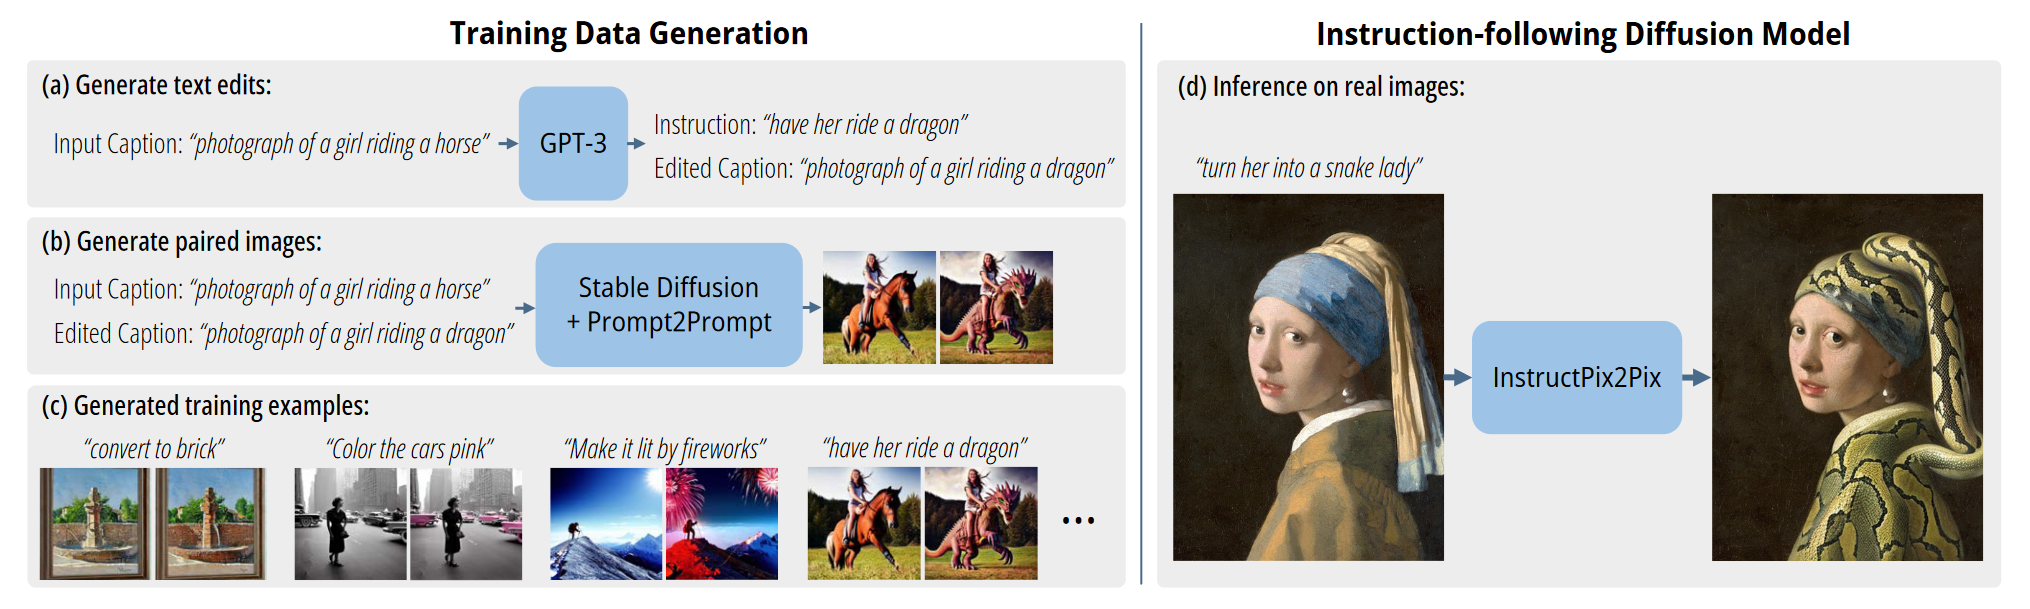
InstructPix2Pix: Learning to Follow Image Editing Instructions
主要方法
Our method consists of two parts: generating an image editing dataset, and training a diffusion model on that dataset. (a) We first use a finetuned GPT-3 to generate instructions and edited captions. (b) We then use StableDiffusion [52] in combination with Prompt-to-Prompt [17] to generate pairs of images from pairs of captions. We use this procedure to create a dataset (c) of over 450,000 training examples. (d) Finally, our InstructPix2Pix diffusion model is trained on our generated data to edit images from instructions. At inference time, our model generalizes to edit real images from human-written instructions.
论文使用现有的 LLMs 工具生成训练数据集,再使用上述生成的数据微调 Stable Diffusion Model,最终得到可以根据指令 caption 进行图像编辑的 Diffusion Model。
-
训练数据生成阶段:
- 首先使用 Input Caption 描述一张图像,并使用 GPT-3 通过指令 Instruction 生成修改过后的图像描述 Edited Caption,如 Input Caption “一张女孩骑在马上的图片”通过指令 Instruction “让她骑在龙上”得到 Edited Caption “一张女孩骑在龙上的图片”
- 使用 Stable Diffusion 以及 Prompt2Prompt 通过 Input Caption 以及 Edited Caption 生成一组图像对
- 最终得到图像对以及指令 Instruction 组成一组训练数据
-
使用上述训练数据微调 Stable Diffusion:
首先,对于一张图像 ,我们将其通过编码器 转换为对应��的潜变量 。然后,通过一系列的时间步长 ,我们将噪声逐步加入到潜变量 中,得到带有噪声的潜变量 。这里的噪声水平随着时间步长的增加而增大。
接下来,我们训练一个网络 ,使其能够在给定图像条件 和文本指令条件 的情况下,预测出在当前时间步长 , 所加入的噪声。
为了达到这一目标,我们需要最小化以下目标函数 Latent Diffusion Objective:
代表数学期望,训练网络 使其预测的噪声与真实噪声之间的差距尽可能小,即最小化它们之间的欧几里得距离。
To support image conditioning, we add additional input channels to the first convolutional layer, concatenating and .
为了可以使 Stable Diffusion 支持以图像为条件,作者在第一个卷积层中将 与 进行 concat,同时扩充对应网络的 channel 数。
在微调之前,预训练扩散模型通过 Stable Diffusion v1.5 checkpoint 进行初始化,额外增加通道数的卷积参数都被初始化为 0。
训练设置与参数
模型在 分辨率上的 batch size 为 1024,Stable Diffusion 的扩散步数设置为 10, 000,在 8 张 40 GB 显存的 NVIDIA A100 GPU 上训练了 25.5 小时。
推理设置与参数
虽然训练过程在 分辨率上进行,但是在推理阶段直接生成 分辨率的图像效果仍然很好,推理过程扩散步数设置为 100,在 NVIDIA A100 GPU 上推理速度为 9 秒。
Reference Image Guidance
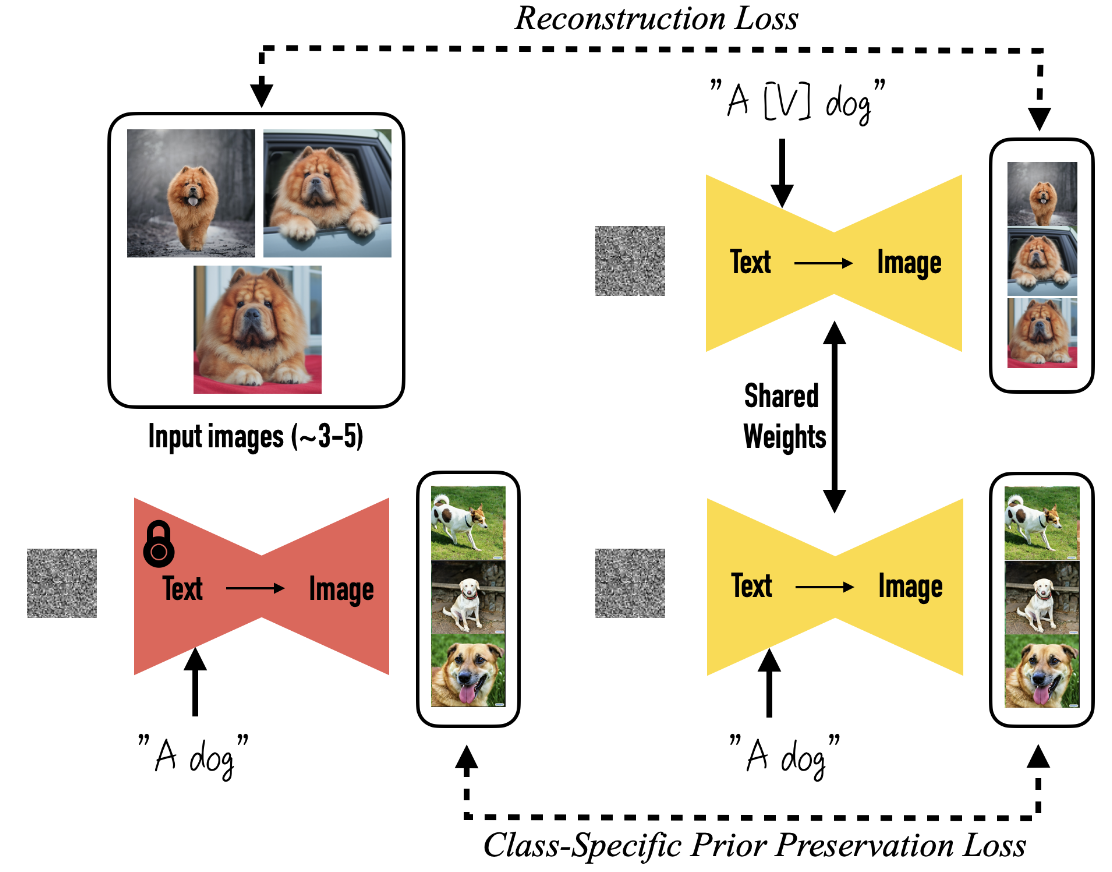
CVPR 2023, DreamBooth: Fine Tuning Text-to-Image Diffusion Models for Subject-Driven Generation
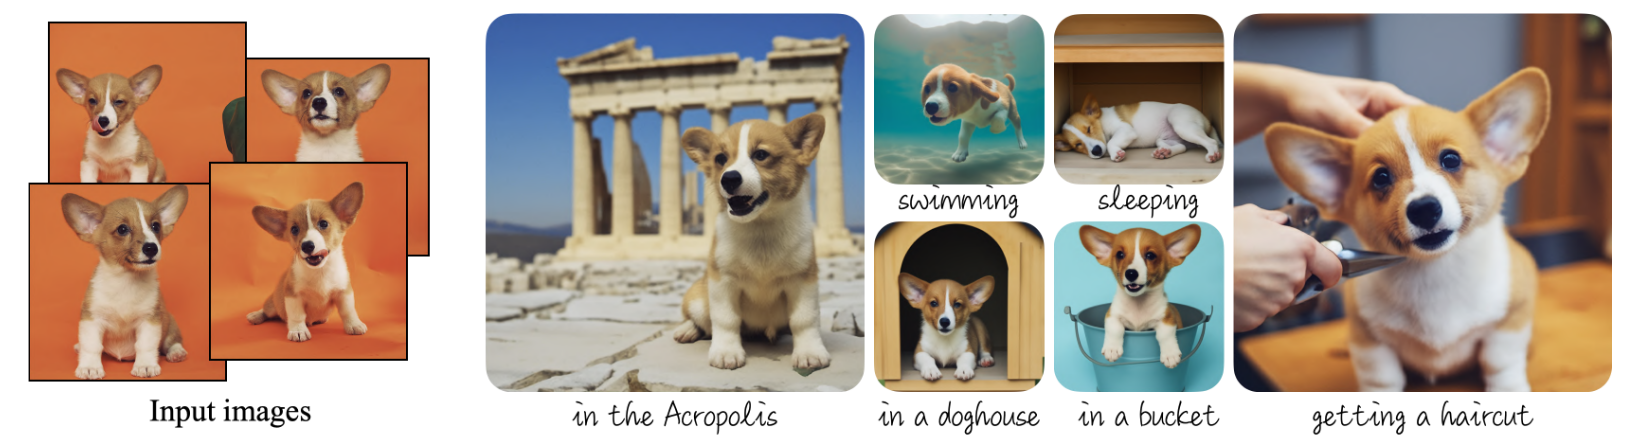
通过接收一组(3~5 张)相同目标(文中称为主题 Subject)的图像,模型可以根据用户提供的 Text Guidance 生成统一主题但不同姿势、不同场景的语义上新的图像。
Text-to-Image Diffusion Model
本文首先使用了一个预训练的 Text-to-Image Diffusion Model ,该模型在给定初始噪声图 和由文本编码器 和文本提示 生成的条件向量 的情况下,生成图像 。使用平方误差损失计算重构损失进行训练,以对噪声图像 进行去噪,如下所示:
其中 是训练集中的 ground-truth 图像, 是文本提示 生成的条件向量。
Unique Subject Identifier
Our first task is to implant the subject instance into the output domain of the model such that we can query the model for varied novel images of the subject.
为了使生成模型生成更多主题不变的相关图像,首要的任务是将参考图像的主题植入到生成�模型的输出域中。
一种自然的想法就是微调模型,然而在大规模语料库上预训练的 LLMs 在少量样本上进行 few-shot 微调时很容易产生**过拟合(overfitting)以及语言漂移(language drift)**问题,因此本文设计了一种新颖的微调方法,为输入的每组主题图像匹配 Subject Indentifier。
具体而言,首先模型为每一组特定主题的图像产生一个形如“A [identifier] [class noun]”的标签,其中:
-
[identifier] 是与主题相关的唯一标识,也是模型可以保存主题特征的重要原因。
本文提出的 Subject Identifier 产生方法是从 Vocabulary 中找出罕见的 tokens,并将其映射到文字空间,以减少 identifier 中包含的先验。
For Imagen, we find that using uniform random sampling of tokens that correspond to 3 or fewer Unicode characters (without spaces) and using tokens in the T5-XXL tokenizer range of {5000, ..., 10000} works well.
对于 Imagen 作为生成模型的情况,作者发现 identifier 所包含的 token 数小于等于 3 时效果最好,当使用 T5-XXL Tokenizer 时,选择 {5000, ... , 10000} 的 token 效果较好。
-
[class noun] 是类别标签,可以通过用户提供或分类器生成,将模型对类别具有的先验融合到主题标识中。
Class-specific Prior Preservation Loss
在微调生成模型时会面临两个主要的问题:语言漂移(Language Drift)和多样性下降。
为了解决上述问题,作者提出了 Class-specific Prior Preservation Loss。
首先使用使用固定参数的 Text-to-Image Diffusion Model 产生 ground-truth 图像 ,其中随机初始噪声 和条件向量 "A [class noun]" 。损失变为:
其中第二项是作者提出的用于保持模型对类别先验的损失函数, 控制该项的相对权重。
微调 Diffusion Model
在微调过程中,每次迭代输入 3~5 张主题图像,进行 1000 次迭代就可以达到比较好的效果。
当生成模型为 Imagen 时,在 TPUv4 上耗时 5 min;当生成模型为 Stable Diffusion 时,在 NVIDIA A100 GPU 上耗时 5 min。
其他细节
本文使用的 Tokenizer 是 SentencePiece��,编码文本的语言模型是 T5-XXL。
训练数据来自于作者的搜集,共包含 30 个主题,其中 21 个主题是物体,其余 9 个主题是动物。